Chances are you have two main reasons for setting up a home network: you want to share an Internet connection between your computers and you want to be able to copy files between computers. If you use a Mac and want to allow access to the network from Windows PCs, you must first create a Windows user account.
Follow these steps on the Mac to create the Windows user account:
1. Open System Preferences from the Apple menu.
2. Click the Accounts icon to open the Accounts window.
3. Click New User (OS 10.3 and earlier) or the plus sign in the lower-left corner of the Accounts window (OS 10.4 and later).
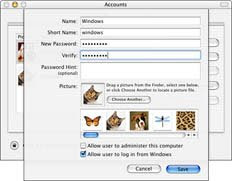
4. Enter a name, short name, and password for the user (see Figure 1).
For example, you can name the account Windows to help you remember the purpose of the account later.
Figure 1: Name the Windows user account.
5. Select the Allow User to Log In from Windows check box if you see it.
As the name implies, this option enables users to log in using this account on Windows PCs. This option is not available (or required) in newer versions of Mac OS X.
6. Click Save or Create Account (depending on your OS X version) to save the new user account. The Windows account now appears in the list of user accounts, as shown in Figure 2.
Figure 2: The Windows account appears in the list.
Because Mac OS X is based on UNIX, user account names and passwords are case sensitive. Make sure that Windows users on your network know this, because if the user name is "Windows" and they try to log on using "windows," the log in attempt will be unsuccessful.
0 comments:
แสดงความคิดเห็น