

Before you get started with DVDs on your MCE PC, it's worth spending a few minutes setting your preferences for DVD playback. Just follow these steps:
1. Open Media Center.
Press the green button on the remote. You also can press the start button and select Media Center.
2. Select Settings.
3. Select DVD.
The DVD Settings screen appears, as shown in Figure 1.
Figure 1: Setting your DVD preferences.
4. Select Language.
The DVD Language Settings screen appears, as shown in Figure 2. You use these settings to determine the default language in which you want to view movies.
Figure 2: Setting your DVD language defaults.
5. Navigate to the plus or minus button next to each option, and press OK repeatedly to cycle through the alternatives:
• Subtitle: The language in which you want your subtitles (or on-screen text dialogue) to appear. The default is None.
• Audio track: The language in which you want to hear your DVDs. (Many DVDs have audio tracks in multiple languages.) The Title Default option lets your DVD decide which language to use.
• Menu: The language you want to use for the DVD's on-screen menu system. (Again, many DVDs have multiple languages available.)
Most DVDs enable you to adjust the subtitle, audio track, and menu languages from their own DVD menu. These override your system settings when you play the DVD. So you're not stuck with MCE-stored settings — if you're a Kurosawa fan, for example, you can decide halfway through that you want to listen to Shichinin no samurai (Seven Samurai) in Japanese, with no subtitles.
If the language you select is not available on the DVD, you get the DVD's default language (usually English).
6. Select Save.
You return to the main DVD Settings menu (refer to Figure 1).
7. Select Audio.
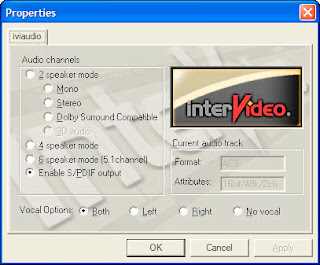
A Windows XP dialog box appears on the screen, similar to the one in Figure 3. That figure shows the InterVideo WinDVD used by a Gateway MCE PC. What happens next depends on your MCE PC and your DVD decoder hardware and software.
Figure 3: Setting your audio up for DVDs.
8. Choose the type of audio output you want from your DVD, and then click OK.
The options will vary, depending on whether your MCE PC can support digital audio outputs for connecting to a home-theater receiver. Some general advice follows:
• If two speakers are connected to your MCE PC, click the 2 speaker mode option. Under that option, click Stereo if you have two speakers, or click Dolby SurroundCompatible if you don't have digital audio outputs and are planning on connecting to a home-theater receiver with two analog audio-interconnect cables. You'll probably never choose the one speaker option (Mono).
• Click 4 speaker mode if four-speaker (quad) surround sound is attached to your MCE PC.
• Click 6 speaker mode (5.1 channel) if a 5.1 surround-sound system is connected to your MCE PC's audio card.
• Click Enable S/PDIF output if you have a digital audio connection to your home-theater receiver.
9. Back in the main DVD Settings screen, select the last option, Program remote buttons for DVD.
The Remote Control Settings screen appears, as shown in Figure 4.
Figure 4: Setting up your remote control.
10. Select the option you prefer for the Skip and Replay buttons on your remote.
• Select Skip chapters if you want these buttons to skip between chapters on the DVD. (Chapters are smallish segments of the movie.)
• Select Skip forward and back if you want these buttons to behave like the REW and FWD buttons on the remote (rewinding and fast forwarding without regard to the chapter structure of the DVD).
11. Select Save.
You're finished!
0 comments:
แสดงความคิดเห็น