Using Graffiti Letters and Numbers

You can see the letters abc in the lower-left corner of the Graffiti area. That's to remind you that you have to write letters on the left side of the box. The numbers 123 are printed in the lower-right corner, to remind you that — you guessed it — you can write only numbers on the right side of the screen. Two tiny triangles separate the letter-writing area from the number-writing area.
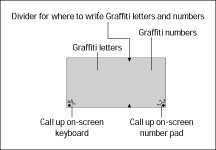


Figure 1: The Graffiti writing area.


Graffiti is a special alphabet you have to understand; it's not handwriting-recognition software that learns your handwriting style. Most of the letters and numbers in the Graffiti alphabet are the same as the plain block letters you were taught to use in the first grade, with one important adjustment: Graffiti letters must be written with a single stroke of the stylus. If you remember that one rule, Graffiti seems simple.

For example, Figure 2 shows the letter A in Graffiti.
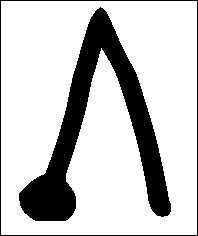


Figure 2: The letter A.


The Graffiti letter A looks just like a normal capital letter A without the crossbar. (That dot on the lower-left end of the A shows where you begin the stroke — it's the same place most people begin writing a capital A.) You don't write a crossbar because writing it requires a second stroke of the stylus. Picking up the stylus is the way you tell Graffiti that you've moved on to the next letter. For the letter A, just draw the upper, triangular part of the A and then move on to the next letter. (As I said, it takes much less time to do this than to read about doing it.)

Your Palm device comes with a little sticker that shows you the whole Graffiti alphabet. You can put the sticker on the back of your unit or on the inside cover of your Palm III so that you always have it as a reference.

Nearly all Graffiti charts display the alphabet as little squiggles with a dot at one end. The dot tells you where to begin drawing the Graffiti stroke. Think of it like those connect-the-dot games, except that you connect only one dot.

In case you've lost the little sticker, Figure 3 shows the whole Graffiti alphabet.
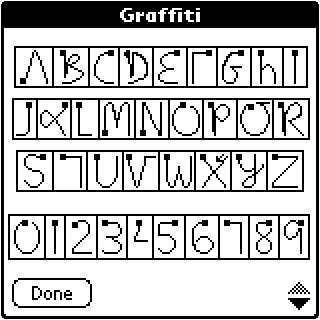


Figure 3: The whole Graffiti alphabet.


As you can see, the Graffiti alphabet is easy to understand. The trick is remembering the tiny differences between regular printing and printing Graffiti.

If you need some help with Graffiti while using your Palm device, you can bring up a Graffiti cheat sheet right on the screen in most programs, like this:

1. Tap the Menu soft button.

The menu bar appears.

2. Choose Edit-->Graffiti Help.

The Graffiti Help screen appears.

After you've found the Graffiti letter you want to use, tap the Done button to return to the program and write the letter.

The Graffiti Help screen appears only when it's possible for you to enter text. If you're looking at the To Do list, for example, the Graffiti Help screen doesn't appear because you have to select a To Do item or create a new to-do before you can enter text.

You may find that getting used to writing Graffiti takes a little time. Don't despair — that's normal. Like most computers, your Palm device can be finicky about what it accepts when it comes to individual things like human handwriting. Because my handwriting is pretty awful, I often have to write more slowly and carefully when I'm entering Graffiti characters than I do when I'm writing normal text on paper.

If you're a touch typist, you probably won't achieve the kind of speed when you're entering text in Graffiti as you do by typing. The point of Graffiti is not so much speed as convenience; you use Graffiti when dragging a keyboard around just isn't practical.

Moving the Graffiti cursor
When you're creating text in Graffiti, you always see a little blinking line in the display area, named the insertion point or the cursor, which shows you where the next letter you enter goes. Sometimes, you want to make the cursor move without entering a letter or you just want to enter a space between words or a line between paragraphs.

To create a space, draw the Graffiti space character in the Graffiti area, as shown in Figure 4. It's just a horizontal line drawn from left to right.
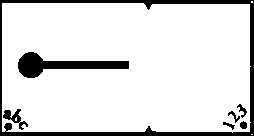


Figure 4: The space character.


If you make a mistake, you may want to backspace to erase the last letter you wrote. The backspace character works just like the Backspace key on a regular desktop computer. To backspace, draw the Graffiti backspace character in the Graffiti area, as shown in Figure 5. The character is just a horizontal line drawn from right to left, the opposite of the space character. Although some characters have to be entered either in the letters or numbers area of the Graffiti box, you can enter spaces and backspaces in either area.
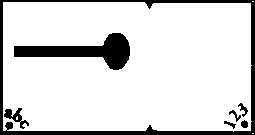


Figure 5: The backspace character.


Whenever you want to delete a whole word or a larger block of text, it's quicker to select the text before drawing the backspace character to delete everything you've selected. To select text, draw an imaginary line through the text you want to select in the display area (not in the Graffiti area). You can see which text you've selected because it's highlighted. Backspacing after highlighting text erases that text. You can also just begin writing again after selecting text; the new text replaces the old.

If you're finished with the line you're writing and you want to begin entering text on a new line, use the Graffiti return character. It works a little like the Enter key on a regular desktop computer, although you use the return character much less on a Palm device than you do on a regular computer.

To insert a new line, draw the return character in the Graffiti area, as shown in Figure 6. It's a slanted line drawn from the upper-right to the lower-left part of the Graffiti area.
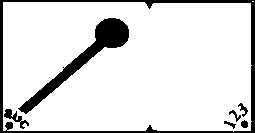


Figure 6: The return character.


Making capital letters without a shift key
When you type a capital letter on a regular keyboard, you hold the Shift key while typing the letter. Because you can't hold a key while entering a Graffiti letter, you have to enter the shift character before entering a letter you want capitalized.

The shift character is simply an upward, vertical stroke in the Graffiti text area, as shown in Figure 7. To enter a capital A, draw a vertical line upward in the Graffiti text area, followed by the letter A. After you draw the shift character, an upward-pointing arrow appears in the lower-right corner of the screen to show that your next letter will be capitalized.
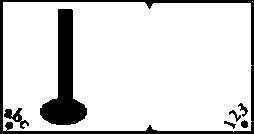


Figure 7: The shift character.


On a regular keyboard, if you want to capitalize a whole string of letters, you press the Caps Lock key and type away. After you finish typing capital letters, you press the Shift key to return to regular, lowercase text.

Entering two shift characters in a row in Graffiti, as shown in Figure 8, is the same as pressing the Caps Lock key. After you enter the shift character twice, you see an arrow with a dotted tail in the lower-right corner of the display area, which tells you that all the text you enter will be capitalized. You can cancel the Caps Lock by entering the shift command again.
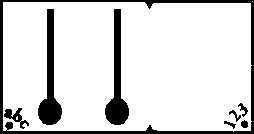


Figure 8: The Caps Lock command.


In quite a few cases, because Palm Computing applications assume that the first letter of a sentence or proper name should be capitalized, the shift arrow automatically shows up in the lower-right corner of the screen to indicate that the next letter will be capitalized. If you don't want to capitalize the beginning of a sentence, enter the shift character twice to return to lowercase text.

Graffiti has another type of shift character, the Extended Shift, which is entered as a downward, diagonal line starting from the top-left, as shown in Figure 9. The Extended Shift character offers a way to enter special characters, such as the copyright symbol (©) and the trademark symbol (™). You can also use Extended Shift to create certain punctuation characters, such as the upside-down question marks and exclamation points you need for entering text in Spanish in addition to some mathematical symbols, like plus signs. When you enter the Extended Shift stroke, a little, diagonal line appears in the lower-right corner of the screen.
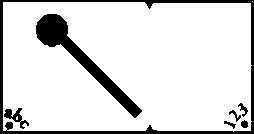


Figure 9: The Extended Shift stroke.


Another shift character you may use is Command Shift, an upward, diagonal line starting in the lower-left part of the Graffiti screen, as shown in Figure 10. You can perform quite a few common tasks in many Palm Computing programs by entering Command Shift followed by a letter. To delete a To Do item, for example, tap the item and then enter the Command Shift stroke followed by the letter D. That step opens the Delete dialog box, just as though you had chosen Record-->Delete Item from the menu. You can see what Command Shift can do in any program by tapping the Menu soft button and looking at the list of commands on the right side of each menu.
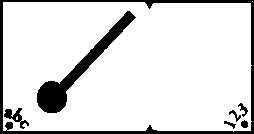


Figure 10: The Command Shift stroke.


Punctuating your text
Although Graffiti letters and numbers look somewhat normal, Graffiti punctuation is strange. You may not want to punctuate when you're entering Graffiti text except for the occasional period and dash.

To enter punctuation characters (such as periods, dashes, and commas) you have to tap your stylus once in the Graffiti area before entering the character. Many punctuation characters have different meanings if you don't tap first before drawing them. When you tap once, a little dot appears in the lower-right corner of the display area to show that you've tapped.

The simplest punctuation character is the period. Tap twice in the Graffiti area to create a period. Figure 11 shows a dot where I'm making a period.
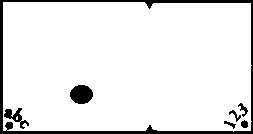


Figure 11: The Graffiti period.


The second simplest punctuation character is the dash. Tap once in the Graffiti area, and then draw a horizontal line from left to right. After you've used Graffiti for a while, you'll think of this as tapping and then drawing the space character.

If you need to enter e-mail addresses in the Address Book, you almost certainly need to be able to enter the @ sign, for e-mail addresses that look like somebody@something.com. The @ sign is simply a tap followed by the letter O.

Looking to Your Palm for Your To Do List

The To Do List on your Palm device can help you keep a handle on all those little errands and projects that take up your time. You can add a task when you think of it rather than wait to get back to your computer. Just push the To Do List hard button (second from the right at the bottom of your Palm device) to call up the To Do List.

Note: If you've replaced the To Do List with some other program, such as To Do Plus, the following instructions may not help you.

Here's how to add an item to the To Do List:

1.With the To Do List open, enter the name of your task with either the onscreen keyboard or Graffiti.

2.Tap any blank area of the screen or press the Scroll Down button at the bottom center of the case.

Ta Da! The highlighting next to your new item disappears and you have a task to do.

Then, knowing what a productive, demanding person you are, the To Do List also enables you to assign priorities, categories, and due dates to each task. To add such details to your tasks, follow these steps:

1.With the To Do List open, tap the name of the task to which you want to add details.

2.Tap Details at the bottom of the display area.

3.To set the priority of your item, tap one of the numerals (1 through 5) next to the word Priority.

4.To assign a category to your task, tap the triangle next to the word Category, and tap the name of the category that you want to display.

The first time you use your Palm To Do list, a list of 4 available categories appears (but you can add some more — up to 15 categories). Note that you can't assign any item to more than one category.

5.To assign a date to your task, tap the triangle next to the words Due Date.

A list of these options appears: Today, Tomorrow, One week later, No Date, and Choose Date. Tapping Choose Date opens the Date screen, which looks like a calendar.

6.Tap the name of the due date that you want for your task or tap the desired date on the Calendar if you want to Choose Date.

7.Tap OK.

Backing Up Files with the Windows Vista Backup Files Wizard

With the Backup Files Wizard in Windows Vista, you can perform a manual backup of particular types of files or let the wizard perform the backup automatically. Although the Vista interface allows you to schedule a backup job to run automatically, it doesn't allow you to configure multiple jobs. Therefore, you should schedule a job that captures the types of files that you want to back up on a regular basis. For a more customized backup event, such as backing your music files to a CD or DVD, you need to run the job manually.

To perform a backup with the Backup and Restore Files Wizard in Windows Vista, follow these steps:

1. From the Backup and Restore Center interface, select Change Settings under the Back Up Files button.

2. Select the Change Backup Settings button.

3. When prompted with the Where Do You Want to Save Your Backup window, select a location.

Your choices are

• A hard disk:The hard disk can be an internal or external disk, but it cannot be a flash drive device.

• CD: Any writable CD-ROM.

• DVD:Any writable DVD-ROM.

• On a network:A network location can be a network resource or an Internet backup service.

4. After you select the appropriate backup location, click Next.

You are prompted to select the file types to be backed up. Here, you don't specify specific folders. Instead, you're prompted to provide the types of files that you want to back up, such as pictures, music, videos, e-mail, documents, TV shows, compressed files, and additional files. Microsoft describes the additional files option as being any other files that do not fit in the other categories. However, system files, program files, and temporary files will never be backed up.

If you move your cursor over each file category type, information about that particular category is displayed. Become familiar with exactly what is included in each category type. Although the utility doesn't allow you to point to a specific folder, organizing your data at the folder level continues to be important during the restore process.

5. After you select the file types that you want to back up, click Next.

You're prompted to configure how often you want to run this backup.


6. Choose Daily, Weekly, Monthly, or specify what day of the week and what time you would like it to run.

7. Execute the backup by clicking the Save Settings and Start Up Backup button.

Using Password Prompt and Password Reset in Windows

If you forget your Windows password, Microsoft can't help you, gurus on the Internet can't help you, and your mom can't help you. What's a person to do? You need to protect yourself against losing or forgetting a Windows password.

First, you can add a hint to your password prompt in Windows. Follow these steps:

1. Pop up the Start menu.

2. Click your account's icon at the top right of the menu.

By clicking your picture, you summon the User Accounts window in the Control Panel, where you can make changes to your account.

3. Click the item titled Change My Password.

You use the next screen to enter a new password and also enter the password hint.

4. Type your current password.

5. Type a new password, or just retype the current password, which you must do twice per the directions in the window.

6. Type a password hint.

The password hint should help clue you in to what the password is, if you forget it. Don't make the password hint the same as the password! That's like taping your house key to the front door — or leaving it in the lock!


7. Click the Change Password button.

To see the password hint, you need to be at the Windows login screen, where you type the password to log in. When you mistype the password, Windows first scolds you; but then when it displays the login screen again, your password hint appears below the password text box.

For even more protection against losing a password, you can create a Password Reset disk. Follow Steps 1 and 2 from the preceding step list to open the User Account information window. From the left, click the link titled Create a Password Reset Disk. Follow the directions on the screen to use the Forgotten Password Reset Wizard.


The Password Reset disk isn't a disk; it's a file, and it can be stored on any removable storage device.

To use the Password Reset disk, simply try to log in to Windows without typing your password. When you do, you're asked whether you want to use the Password Reset disk. Just follow the instructions to do so.

Creating a Password Reset Disk

The minute you turn on password protection for an account, you should create a password reset disk for that account. Why? Because any administrator who can get on your PC can switch your password!

Unless you're using a Big Corporate Network, a password reset disk is a defensive maneuver. It guards you against the slings and arrows of others who use your PC.

Follow these steps to make a password reset disk:

1.Choose Start, Control Panel, User Accounts.

2.Click your account. The User Accounts applet asks what you want to change.

3.In the Related Tasks section, double-click Prevent a Forgotten Password. The Forgotten Password Wizard starts.

4.Click Next. The wizard asks for a drive. You can create a password reset disk on various kinds of removable drives, including flash drives or Flash Memory cards, but the most common is a simple floppy.

5.Choose the drive you want to use for the password reset disk, and then click Next. The wizard asks for the current password.

6.Type the password for the account, and then click Next. The wizard puts a small file called userkey.psw on the disk, and then displays the final screen.

7.Click the Finish button.

No matter how many times you change your password, the last password reset disk created for that account still works. There's no reason to update the disk when you change your password.

Store the disk in a safe place. Anyone who gets the file can log on to your PC without knowing your password.

Using Microsoft Money 2005 to Track a Home's Value or Other Asset

Ask most homeowners what their most valuable asset is, and they'll say their house. But ask them how much equity they have in that house, and you usually get a much less definitive answer — if you get an answer at all. And you would probably get the same response if you ask about other tangible assets, such as art collections, baseball cards, or office equipment. Money can help you peg the value of your assets.

Read on to find out how to track the equity in a house or the value of tangible assets, such as art collections, baseball cards, office equipment, and other property that you can sell.

Setting up an asset or house account
A Money house account and a Money asset account work exactly the same way. Setting them up is easy. Follow these steps to set up a house or asset account:

1. Click the Banking tab to go to the Account List window and click the Add a New Account link under Common Tasks.

2. In the Choose an Account Type window, select the Other option button; then click Next.

You see the first of several windows for setting up new accounts.

3. Select the Asset or Home option and click Next.

You see the Choose Level of Detail window.

4. Tell Money whether you want to simply track the value of the property or asset, or you want to associate the account with a loan or mortgage you are tracking with Money.

If all you want to do is record how the value of the property or asset fluctuates over time, choose the first option; if you want to associate the account with a home or mortgage account so that the principal portion of loan payments counts toward the value of the property or asset, choose the second option.

• Tracking the value of the property or asset value: Click the Just Track the Total Value option, enter a name for the Account in the Account Name text box, enter the value of the property or asset, and click the Finish button.For the value, enter its value as of today if you just acquired it or if you don't want to track its growth since the time you acquired it. If you want to track how the asset or property has grown or shrunk in value since you acquired it, enter 0. Later, you can go into the account register and enter dates and values to show how the value of the property or asset has increased or decreased over time.

• Associating the property or asset with a mortgage or loan: Click the Track Transactions and Other Details option, and click the Next button. In the ensuing dialog boxes, you are asked to name the account, enter the value of the property or asset, and declare whether you want to associate a loan or mortgage with the property or asset. You can transfer the principal portion of a loan or mortgage payment to an asset or house account. By doing so, you can track how much the value of the asset or the equity in the house increases each time you make a loan or mortgage payment.

• To track value or equity increases this way, click the Yes button when Money asks whether you would like to associate a loan account with the asset or house. When you click the Next button, you see a dialog box for selecting loan accounts. From the drop-down list, select the loan account from which you will transfer the principal portion of the loan payments.

Home equity loans should be associated with a house. When you take out a home equity loan, you use your house as collateral. Even if you use the money from the loan to buy a car or boat, for example, associate the home equity loan with your house, not with the asset you purchased with money from the loan.


Recording changes in the value of an asset or house
After you set up the asset or house account, you can record changes in its value simply by opening the account register and entering amounts in the Decrease or Increase column. However, if you associated the asset or house account with a loan or mortgage account, changes in value are recorded automatically each time you make a loan payment. Follow these steps to record a change in value by hand:

1. Open the register of the house or asset account.

2. Click the New button or the Update Current Value link.

You see the Adjust Account Balance dialog box.

3. In the New Ending Balance text box, enter what the value of the asset or home is as of the date you will enter in the next step.

4. Enter the date of the change in value in the As of Date text box.

5. Categorize the change in value in the Category for Adjustment drop-down list.

For example, you could create an income category called Increase Mkt Value (Increase Market Value) to record an increase in value, or a category called Decrease Mkt Value (Decrease Market Value) to record a decrease in value.

6. Click OK.

In the Decrease or Increase columns of the account register, Money enters the amount by which the asset or home increased or decreased in value.

Recording Credit Card Transactions and Payments with Microsoft Money

Besides leaving credit cards at home, one way to keep credit card spending under control is to diligently record charges as you make them. Watching the amount that you owe grow larger and larger in the credit card register should discourage you from spending so much with your credit card.

Recording credit card and line of credit charges
Credit card and line of credit account registers have a Charge form for recording charges. As with the Withdrawal form, the Charge form has places for entering a transaction date, amount, payee name, category, and memo. All the drop-down lists and keyboard tricks work the same way on a Charge form as on a Withdrawal form.

To fill in the Charge form, follow these steps:

1. Open the account register.

2. Click the Charge tab.

3. Enter a reference number (optional).

4. Enter the charge date.

5. Enter the business you purchased the item(s) from in the Pay To box.

6. Enter the amount of the charge.

Don't concern yourself with recording service charges and interest on your credit card. You can do that when you reconcile your account.

7. Select a category.

8. Enter a description (optional).

9. Click the Enter button (or press Enter).

Credit card and line of credit accounts track what you owe, not what you have. Don't forget this all-important detail.


Recording a credit
If you receive a credit from a bank or credit card issuer, perhaps because you overpaid, disputed a bill, or returned an item you bought, record the credit in the credit card account register. To do so, click the Credit tab and fill in the blanks in the Credit form. The Credit form works exactly like the Charge form.

Be sure to record the credit in an expense category. Seems odd, doesn't it, to record credits as expenses? But when you recorded the purchase in the register, you assigned it to an expense category. Now that you're getting a refund, assign it to the same expense category so that the amount you spent in the category is accurate on your reports.


Recording a credit card payment
Before you make a credit card or line of credit payment, reconcile the credit card or line of credit account. Then take note of how much of the debt you intend to pay, and follow these steps to make a payment to the bank or card issuer:

1. Open the register of the account from which you intend to make the payment.

You probably want to open your checking account register.

2. Click the Withdrawal tab at the bottom of the register window.

3. Click the Common Withdrawals button, choose Credit Card Payment, and then choose the name of the credit card account where you track the credit card that you want to make a payment on.

The words "Credit Card Payment" and the name of the credit card account appear in the Category box on the transaction form.

4. Enter a check number in the Number text box if the number that appears there isn't correct.

Remember, you can click the down arrow and choose Next Check Number to enter the next available check number in the box.

5. In the Date text box, enter the date that you wrote or will write on the check.

6. Enter the amount of the check in the Amount text box.

Hopefully you can pay off the entire credit card or line of credit bill, but if you can't, Money doesn't care. Money continues to track what you owe from month to month.

7. If you care to, write a few descriptive words in the Memo text box.

8. Click the Enter button or press Enter.

The amount you paid is deducted from the checking account. Meanwhile, the You Owe amount in the credit card or line of credit register decreases or is brought to zero. In effect, you have transferred money from your checking account to the account where you track credit card charges.

Right-click a credit card payment in a register and choose Go To Account: Credit Card Name (or press Ctrl+X) to go to the account register where you track credit card charges.